How Dry Should My Rda Get Before Dripping Again

With vaping, better performance by and large comes with increased complexity, and nowhere is this more obvious than with rebuildable atomizers. Vapers enthusiastically recommend rebuildable dripping atomizers (RDAs, for curt) to boyfriend vapers. But when yous start option i upwards, the unanimous response is a "what the hell am I supposed to exercise with this thing?"
You may feel out of your depth the first time y'all encounter a mod. The voltage, wattage and ohm-readings all crowding the modern's display screen can definitely experience overwhelming, just your showtime endeavor at setting upwards an RDA will take yous to a new level of bewilderment. So if you're in this state of affairs – and we've all been there – information technology isn't as scary equally it may expect. Information technology might not feel like it, but you'll be confidently building your ain coils in no time.
All you need is an introduction to RDAs, how they're laid out and how to build your first RDA coil.
What is an RDA? What Almost an RTA?
Although nosotros've covered this previously, it'southward a good idea to go over the basics again here. A rebuildable dripping atomizer (RDA) is a bare-basic style of eastward-cig atomizer. They feature a coil and wick but no tank to hold e-juice. Instead, y'all drip smaller amounts of eastward-liquid straight onto the ringlet and wick. And so y'all vape until the wick starts to dry out earlier dripping once again. They're "rebuildable" because instead of screwing in a pre-wrapped, cocky-independent coil, you wrap your own coil and attach it to the atomizer.
RTA stands for "rebuildable tank atomizer." These are basically the same as RDAs except they do have a tank. This ways you get the performance without the abiding dripping. This provides a nice balance between the improved operation of a rebuildable atomizer and the convenience of the more mutual tank systems. In do, the structure of an RTA is basically a mini RDA surrounded past a tank, with minor holes for juice to feed up into the wicks.
Under the Meridian Cap: RDA Decks Explained
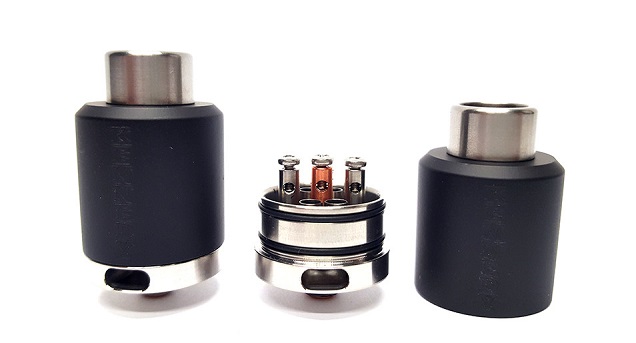
The first footstep to not being terrified of RDAs is understanding their layout and how they work. The general structure of an RDA consists of a top cap and baste tip covering a deck. The top cap is but the outer cover of the RDA, and the drip tip is really a mouthpiece for inhaling through.
The deck is where the action happens. This is the part that's confusing every bit a newcomer to RDAs, but the confusion is really because there seems to be so petty there. Decks mostly consist of a few posts with holes through the centre and piddling else, with a pocket-sized lip effectually the outer edge and no indication whatever of what yous should really practice.
The details vary depending on your device, though, so hither are the near mutual layouts y'all'll come across:
Three-Mail RDAs
Three-postal service RDAs are the most basic style and the simplest ones to understand. These accept i post in the heart – the "positive" post – and ii on the outer edges of the deck – the "negative" posts. The positive and negative posts are used to connect up your coil. Equally the names suggest, they connect your ringlet up to the positive and negative ends of the circuit. In other words, y'all need to connect the positive to at least 1 negative post to complete the excursion.
Most modern RDAs have holes direct through the post itself. These are opened up by unscrewing a screw in the top of the post. Previously, yous'd have to trap the terminate of your wire under the screw-head at the top of the postal service, only nowadays you simply insert it through the pigsty in the center and use the spiral at the peak of the post to tighten it down. One time you lot've washed this with both of the legs of your coil, y'all've completed the excursion and the coil will function. It's best to trim the "legs" of the curlicue down so they sit down as affluent to the posts as possible, though.
These RDAs take three posts so you can connect up 2 coils more comfortably. By allowing the ii coils to share the center (positive) post, you're left with one negative post per roll. This gives you more infinite and makes it easier to connect everything up without developing a short.
Four-Mail service (Split Center Postal service) RDAs
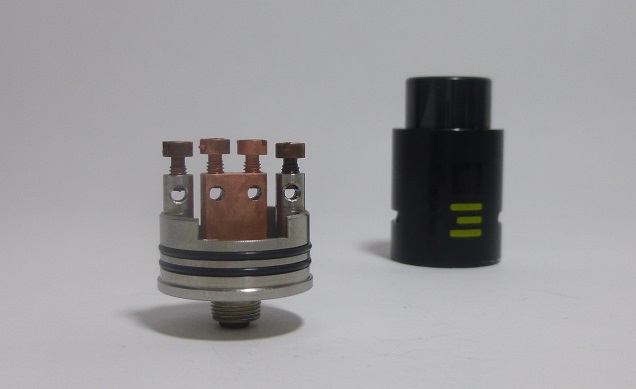
The most common manner in which the three-post design is modified is by splitting the center post into two. These are still both positive posts, and then they both raise up from the same spot in the eye of the RDA'south deck, but they separate out a picayune farther upward, so they accept two post-holes a comfortable distance from each other.
The do good of this is that it makes it fifty-fifty easier to connect up multiple coils, because the positive ends don't have to share the same post-hole. This means your two coils can be completely split up from each other, and generally makes the edifice process easier. For this reason, the majority of RDAs released today volition either accept this layout or the one described in the side by side section.
Two-Post (Velocity-Style) RDAs
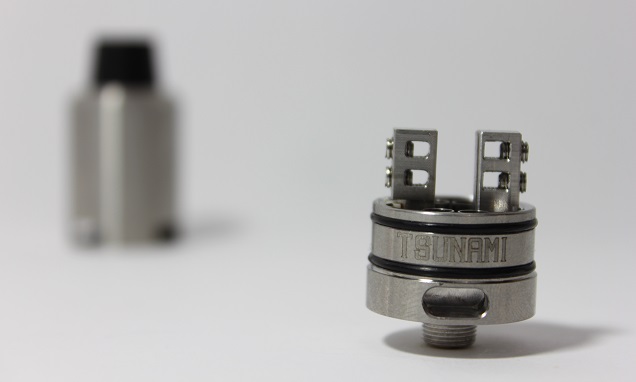
Going to two post designs subsequently discussing three and four mail service ones might seem unexpected, merely arguably the biggest improvement to the layout of RDAs in recent years came from a device called the Velocity. Instead of having three or four posts, this RDA put the positive mail service off to one side and left the negative post on the other, but it took the key step of having 2 holes in each post, one above than the other.
This offers the same benefits when it comes to connecting upwards multi-coil builds, since you have one post hole for each leg on a two-coil build, but makes the whole layout more than spacious without affecting ease of use. The screws for the post-holes (or at least for one set of them) are moved to the side of the posts, but the performance is effectively identical.
This layout is no longer confined to the Velocity RDA, with many other devices taking the same layout since information technology's release, such every bit the GeekVape Tsunami.
It'south worth noting that if you went back into vaping history, you'd find a lot more two-postal service RDAs, merely these aren't Velocity-manner offerings. Instead, the 2 posts were a positive and negative post merely capable of holding a single wire-finish (and usually in the trap-under-spiral-head style), and the devices were very bones. You won't discover anything like this these days – unless you selection up an erstwhile IGO-L from someone – but it's worth mentioning for completeness anyway.
Postless Decks
There are quite a few other unique designs for RDAs (discussed on this reddit thread). However, the most common alternative layout you lot'll notice is a postless deck.
This may sound outlandish, merely really it'due south more similar to ordinary decks than y'all might imagine. The posts aren't actually what's of import; it's the holes for you to connect your gyre-legs up to. For postless decks, there are holes for the positive and negative ends in the same fashion. The difference is that these holes just go direct down into the deck instead of being drilled through erect posts. They have screws around the border of the deck to allow you lot to open up up the holes and trap the wire in the same mode every bit posts practice.
Juice Wells, Airflow Layouts and Other Features
Before we go out the design elements of RDAs bated and focus on how you build a coil, it's worth mentioning the other key features you might find on an RDA. Actually they're all quite similar, but small changes can make a big departure to performance and ease of use.
Juice Wells Explained
The simplest boosted feature for an RDA is the size of the juice well. The deck is surrounded past a raised lip. This is designed to hold a minor amount of e-liquid and then you lot don't have to "drip" quite as ofttimes. This is unremarkably advertised by depth (due east.g. "a 6 mm juice well"), and in full general a deeper juice well is preferable.
RDA Airflow Designs
One of the other main things you lot'll see advertised about RDAs is the airflow system used. These can vary quite a lot – from simple slots in the side of the pinnacle cap to more complicated systems – but the goal is always the same. The aim is to provide as much control over airflow as possible without causing too much leaking. Some leaking is hard to avert, just obviously it'southward not platonic, and manufacturers tend to exercise as much as they can to minimize information technology.
Air going directly across the coil from underneath straight upward to the mouthpiece offers some of the best performance. The problem is that accomplishing this without causing leaking issues is a challenge. This is why some airflow systems are a little circuitous. Getting the air to hitting the coils at an opportune bending often opens you upwards to excessive leaking, then manufacturers have to be inventive to solve the problem. Some airflow systems depict in air from the top and channel them downwards so the nonetheless hit the coils from underneath. Other systems use a swirling, vortex-like airflow to improve performance without the need for an under-curl layout.
Choosing between these isn't peculiarly piece of cake, and personal preference has a big part to play in your choice. You should exist able to run into the potential upsides and downsides of different layouts based on what yous've learned. Still, you lot won't get an idea of what y'all personally like until yous try a few options out. It must be added that most RDAs are much better-suited to wide open airflows and directly-to-lung hits. However, you lot tin ordinarily close the airflow down enough for a mouth-to-lung vape if you adopt. There's more info on inhalation styles here.
Why Post Hole Size Matters
Another key design feature relevant to RDAs is just how big the holes in the posts (or deck) actually are. This is primarily important because the wire you use for edifice differs in size, with lower AWG numbers significant a thicker wire. Post hole size is peculiarly important if yous're hoping to employ other wire types such as twisted wire (where two strands are twisted together earlier being made into a coil) or Clapton wire (where a wire is wound around a central core, like a guitar string). In general, almost modern RDAs volition be able to accommodate these wire types. That said, due to their design, Velocity-manner two-post RDAs often take the biggest post holes.
Insulators, Drip Tips and More
Other RDA features are less crucial merely still worth considering if you're shopping for an RDA. The posts have to carry a lot of current, so good insulation is essential. This is ordinarily accomplished with PEEK insulators, which have great heat-resistance and tin can cope with sub ohm vaping.
Baste tips used to all be fairly narrow, merely now many devices come with "wide-bore" baste tips. These have larger openings to better airflow. If you're looking for a straight-to-lung vape and desire big clouds, wide-bore baste tips are a great characteristic for an RDA. Even so, they exercise reduce flavor compared to thinner tips.
This really merely scratches the surface of the different RDA features you might meet. Just information technology should give you an thought of what you lot can expect if y'all're shopping for an RDA.
The Beginners' RDA Edifice Guide
Then at present yous've gotten to grips with the parts of an RDA and have a bones idea of what to wait out for if you're planning on ownership i, the only issue remaining is the big one: what do you do with it when yous have one?
Thankfully, despite how scary information technology may seem when y'all're first trying to build your own coil, RDAs are straightforward enough in one case y'all've gotten the basics downward. After mastering a basic coil build, you'll be ready to caput out into the large wide world of different coil styles and arrangements, giving you more control over the blazon of vape y'all go than you'd have thought possible.
What Y'all Need to Build a Coil
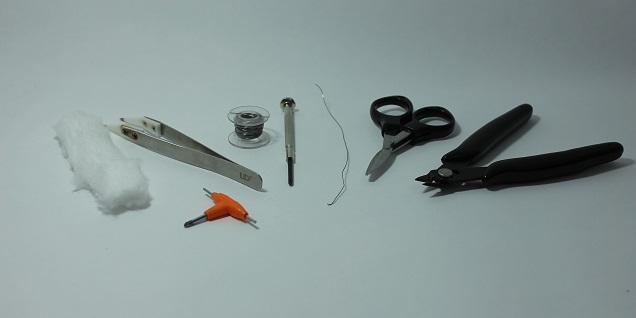
Earlier y'all go started building a coil, at that place are a few things you'll need:
- Resistance wire (Kanthal, nickel, stainless steel or titanium wire). The most important thing yous need to build a coil is the wire the roll is fabricated from. This is ordinarily Kanthal, in your chosen "gauge." In American Wire Approximate (AWG) numbers, a lower number is a thicker, lower-resistance wire, and higher numbers are thinner, higher resistance wires. For most purposes these days, 26 AWG or lower Kanthal is the best matter to build with. Lower gauges produce lower resistances, though, then don't get below this unless you lot have a mod that can cope with it. If you lot want builds over 1 ohm, 28 AWG is better. Other materials (such every bit nickel) are used for edifice temperature command coils, simply they're harder to work with and aren't recommended for beginners.
- Screwdriver/hex key (to unscrew the postal service-screws). This is unproblematic. To unscrew the screws on your RDAs posts, you'll need a matching screwdriver or hex key. Oftentimes, RDAs come with appropriate screwdrivers, but a set of precision screwdrivers is a useful addition to any vapers' arsenal.
- A "guide" for edifice (screwdriver or drill chip). One challenge when building a coil is to brand a coil with a uniform diameter. This means you'll need a "guide" to work on. A precision screwdriver does this chore nicely, but you could also utilize a drill fleck or anything else with a uniformly cylindrical department. Aiming for a 1.5 to 3 mm diameter is a good starting bespeak. The aforementioned number of wraps of your whorl will give more resistance for a bigger bore and less resistance for a thinner i.
- Wick textile (cotton, silica or other materials). At that place are many options for wicking materials (which nosotros'll cover in more particular in a future post – simply there'due south more info hither), simply most vapers these days employ some form of cotton as a wick. Japanese organic cotton is the industry-standard at the moment. This is purchased in sheets which tin be easily cutting to size. Nevertheless, other options like Cotton Bacon (a cotton designed specifically with vaping in heed), cellucotton and even just plain sometime cotton balls will do.
- Tweezers. Tweezers are vital if you desire to make a contact curl – which is what we'll be doing here. While any tweezers are fine, ceramic-tipped ones have a definite advantage. With metal-tipped tweezers, you tin can't touch the gyre while pressing the burn button, because it'll cause a short. With ceramic-tipped ones, this isn't an upshot.
- Wire cutters/scissors. You'll need some wire cutters or scissors to trim the legs down once your coil is all connected up.
How to Build an RDA Coil
So if you take everything y'all need, information technology'due south time to get started. Here, we're going to build a single contact coil (a micro coil), but information technology's non very hard to extend this to multi-coil builds if you get more ambitious in future – just make two coils that are equally similar as possible.
Plan Your Coil
This isn't strictly necessary, just it tin be useful. If you have a specific resistance range in mind, the scroll wrapping tool on Steam Engine is excellent. Input your wire type, bore/gauge, the coil'due south inner diameter, the length of the "legs" connecting the coil to the posts and your target resistance and it'll tell you lot how many wraps to utilize.
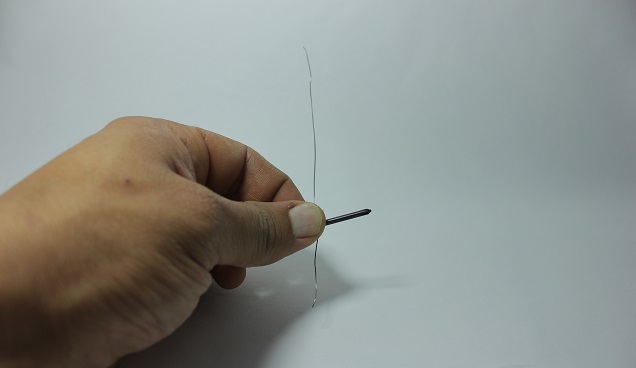
Cut a Section of Wire
Steam Engine will tell you lot how long the wire should be. Nevertheless, information technology's best to over-estimate since Kanthal is cheap and information technology's easier to work with longer strands. I cut mine to around 4 inches a slice, and for your first builds in particular information technology'south best to cutting more. For example, Steam Engine estimates just over 2 inches of wire for a 1 ohm single coil build with 28 AWG wire and a two.5 mm inner bore, only again I'd just cutting iv or even v inches to work with and then trim it down to size later.
Hold Your Guide Up and Get Ready to Wrap
The best matter to do is start near one end of your wire , leaving around an inch spare. Hold this point up against your guide fabric, with about of the wire pointing off upward.
Kickoff Wrapping Your Coil
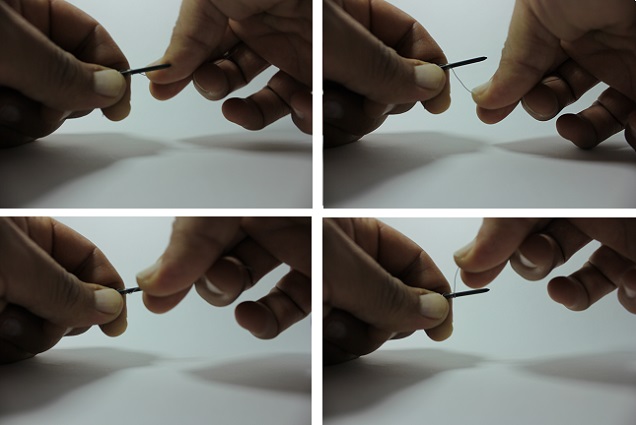
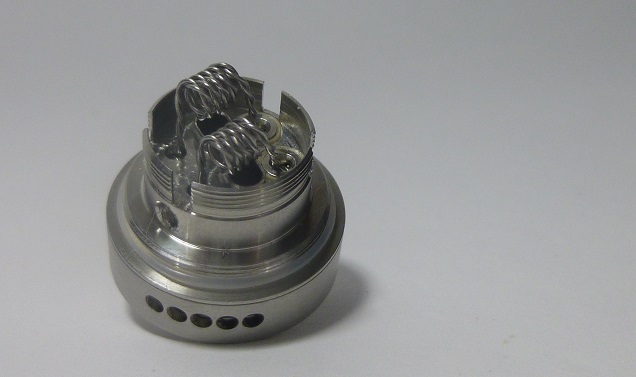
The aim hither is simple: gradually wrap your wire around the guide to form a coil. Since we're making a contact whorl, try to brand each successive wrap as close to the previous ane as possible without overlapping or crossing wires. This is really the challenging part, unfortunately. The best advice is to go on your wire held taut and wrap the gyre with a smooth, consistent motion. It feels a bit similar you're gradually turning a crank. Have your fourth dimension, though – it'south better to be accurate than to exist quick.
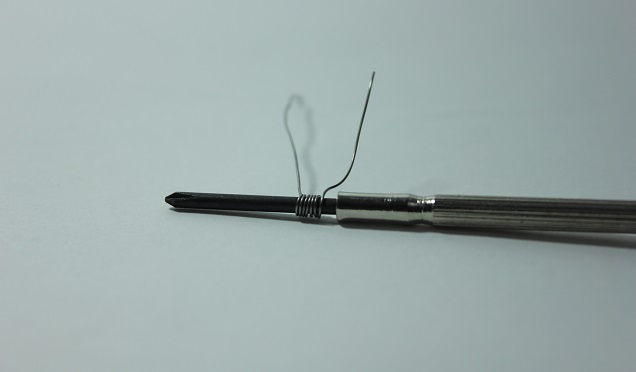
Finish Your Coil on a Suitable Side for Your Atomizer
This depends on your device. On most RDAs, yous'll want both "legs" (the remaining, uncoiled bits of wire) to point in the same direction. Nevertheless, on some devices they need to point in opposite directions. If you accept them pointing in the same direction, yous'll stop up with a curious situation in which the roll looks like a sure number of wraps from the pinnacle and ane less from the bottom. In the example ringlet from the Steam Engine calculator to a higher place, the estimate for "rounded to half wraps" is vi/5. This means it looks like vi wraps viewed from the pinnacle only five when viewed from the bottom.
I find information technology helps to wrap your wire a little scrap further around the guide than you demand to. This ways that when you permit become and it springs dorsum a picayune, the leg is roughly in the right place. Ideally, your legs will be slightly different lengths at this phase, only this isn't essential.
Check Your Coil
Before you get ready to adhere the roll, it'south skillful practice to check that everything is fine. Are the wraps close together without overlapping? If they overlap, yous should rectify it however you tin. Sometimes yous can just conform it with your fingers or a pair of tweezers. However, nearly overlaps mean you'll have to unwind the coil and re-wrap it without overlaps. If your wraps aren't close enough together, y'all tin can probably conform it with your fingernails, pliers or tweezers. Remember that it doesn't have to be perfect at this stage – just correct whatever big errors for now.
This is most of the scroll wrapping procedure washed. The merely thing remaining is to connect it up and put the finishing touches to information technology.
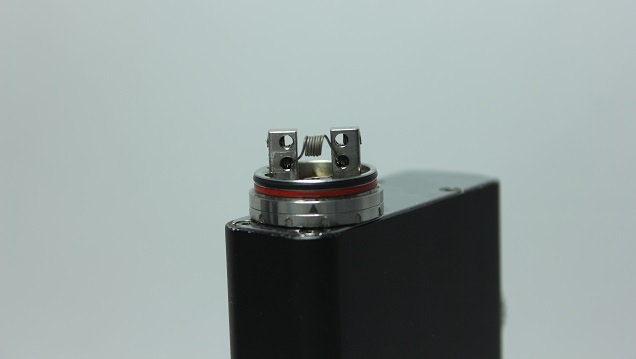
Connecting Your Coil
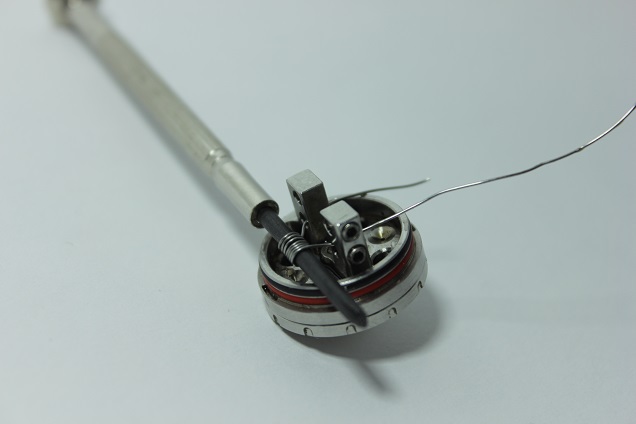
Connecting the coil is really the easy office of the edifice procedure. Dorsum in the days when you had to trap the wire-cease nether a screw-caput, this was a chip fiddly. Thankfully, with modernistic RDAs, all y'all take to do is loosen the screws in the posts and insert the legs through the postal service holes. Refer to the relevant section in a higher place if you want more information. The upshot is yous'll always want to connect i finish up to the center (positive) mail service and the other up to i of the negative posts. For two-mail service designs, one leg just goes to each post.
The biggest challenge is positioning your whorl correct. You want the coil to be close to the posts but not touching them. The best fashion to practice this is to go along your coil on your guide throughout the process. Agree your guide as you lot feed the legs through the open postal service holes. This is where having unlike length legs is useful: so you can thread them through ane at a time rather than both at one time. Use your guide to position the scroll as shut to the posts as you lot can. Once you lot're happy with the position, tighten downward the screws. Make sure the legs are pointing off into the air and not touching the deck, each other or the posts of your RDA – otherwise you could get a short.
Ideally, you'll desire the ringlet to be slightly college than where the airflow enters your RDA. On below-coil airflow RDAs, there'southward nothing to worry almost here, but if your RDA has a slot-style airflow, keeping the coil a fleck higher than the slot will improve your performance. You tin position it hands using your guide. You lot tin remove your guide when everything is in the right place and tightened down.
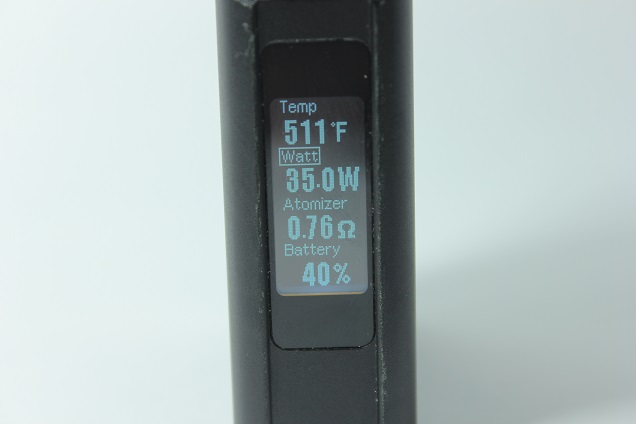
Connect your RDA to a regulated mod or use a resistance-checker to see how many ohms it comes in at. This only actually matters for mechanical devices, but it's good practice to check the resistance of your build anyway – most regulated devices have a set range of resistances they'll work with, and then y'all need to check it's within them.
If you're happy, you tin can trim down the legs equally shut to the posts as yous can.
Finishing Off Your Coil
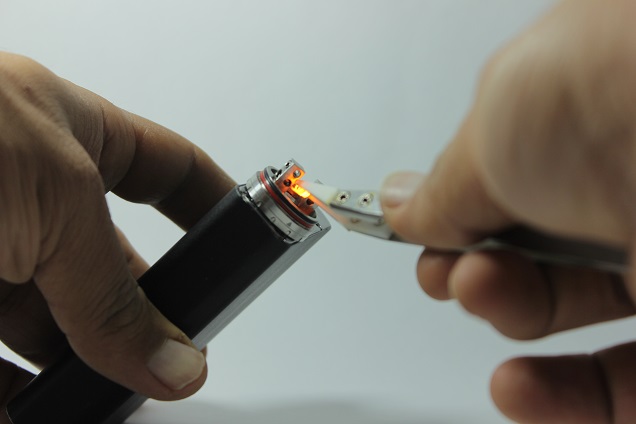
The last phase to the building process for contact coils is to compress them. This is hands done with the assistance of a modern and a pair of tweezers. Attach your RDA to your mod with the height cap removed, and and then press the burn button to send current through the coils. After a second or two, they'll start glowing orange-red, and this is when you can adapt them to perfection.
If you accept metallic-tipped tweezers, release the fire button and then compress the roll from either end using your tweezers. Information technology'south best to almost take your tweezers in position earlier releasing the burn button, but make certain they aren't making contact with the coil until y'all release the fire push. When compressing the scroll, you need to be firm enough to make the wraps affect each other but not so much as to deform the coil. The all-time advice is to start gently and increase the force gradually until the coils press together. Hold the tweezers in position for five to ten seconds equally the coil cools. When you permit go, the coil should keep its shape.
For ceramic-tipped tweezers, the advice is the same as to a higher place just with one key departure. You can make the adjustments while the fire push is held down. This makes this phase much easier, and then they're a expert investment if you'll be building a lot.
When you're happy with the scroll, printing the fire button again. Ideally, you lot'll see an even glow beyond the roll. On lower powers you should be able to notice it starting from the eye and emanating outwards.
Inserting Your Wick
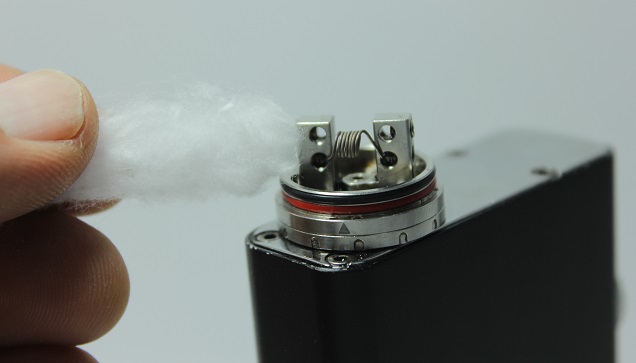
The terminal stage for building your coil is inserting your wick. This is one role that'south more than of an art than a science. The challenge is getting the right thickness on your slice of wick. This is something you lot'll go meliorate at with experience. In general, you desire the section of wick to be thicker than the inner diameter of your coil. In the picture above, you tin see that the wick is most twice as wide as the coil's diameter. However, if it's too thick it will deform your wick as you pull it through. You lot should also make certain the wick isn't really densely-packed – fluff it up a lilliputian bit before you insert it if it'due south really tightly-packed.
Even so, there is some disagreement on the best approach to wicking. One method in particular (called the Scottish Scroll) involves using more wick and having information technology densely-packed. This passes the indicate where it would deform your coil if you only pulled it through, so you concord the coil in place with a finger as y'all do and then.
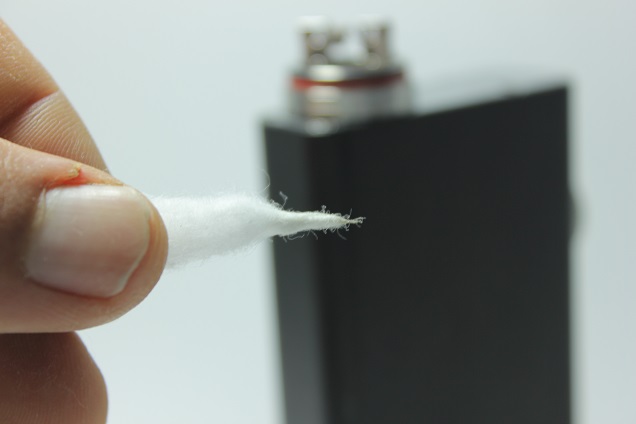
To actually insert the wick, twist one of the ends of your strand into as pocket-sized a point as possible. This makes information technology easier to insert through the eye of your coil. After this, you can grab it from the other side. Pull it through so your wick is reasonably evenly spread across both sides of the ringlet. You may have to hold the scroll in identify every bit you do this if you've used a denser wick.
Trim Your Wick, Drip and Vape
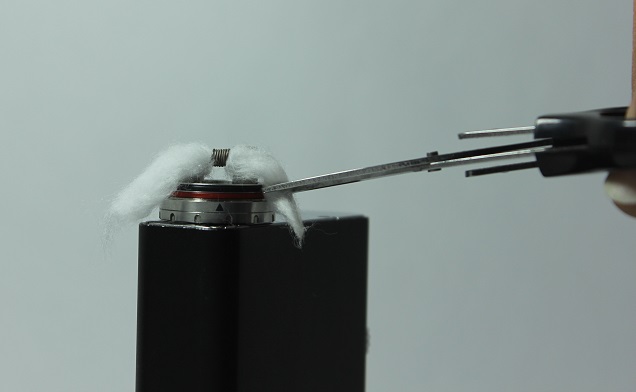
Then when it's in identify, you merely have to trim it downwardly and you're fix to vape. The aim is to cut the wick so both ends just achieve the lesser of the juice well. You can estimate this by comparing the length of your wick with the exterior of the deck on your RDA. Cut it so it reaches the bottom of the deck and yous should accept virtually the right amount. At this point, you might accept a neat edge, so it helps to fluff it upwards a little. You can do this by poking the centre of the wick with airtight tweezers and then letting them open upwardly to spread the wick.
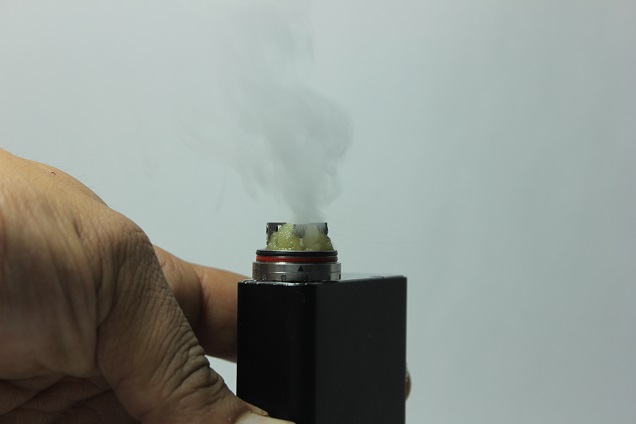
Use a screwdriver or pair of tweezers to poke the ends of the wick downward into the juice well. Now all you have to do is drip juice on the wick and you're ready to vape. Drip plenty to soak the wicks, simply y'all tin can get further and completely fill your juice well if you like. At this point I e'er hit the fire button and triumphantly watch the vapor ascension up from my new coil. Admittedly, though, this is completely and utterly useless.
Conclusion: RDAs Aren't And then Scary
Hopefully this post has shown you that rebuilding really isn't so bad. It's one of the most technical things you'll have to practise every bit a vaper, but you lot'll quickly get the hang of it. Half-hour or even hour-long building sessions when I was getting started are now five to ten minute jobs, and the results keep on improving. Not but volition you get better performance, you'll likewise save tons of money by rebuilding. Don't get disheartened if yous struggle at first: you'll be making splendid coils in no fourth dimension if you keep practicing and experimenting.
claycombforienionly.blogspot.com
Source: https://ecigarettereviewed.com/a-beginners-guide-to-rdas/
Post a Comment for "How Dry Should My Rda Get Before Dripping Again"