How Can I See My Start Debug Menu Size in Visual Studio
This browser is no longer supported.
Upgrade to Microsoft Edge to take advantage of the latest features, security updates, and technical support.
Start expect at the Visual Studio Debugger
This topic introduces the debugger tools provided past Visual Studio. In the Visual Studio context, when y'all debug your app, it usually ways that you lot are running the application with the debugger attached (that is, in debugger mode). When you do this, the debugger provides many ways to run across what your lawmaking is doing while information technology runs. You lot can pace through your code and look at the values stored in variables, you can set watches on variables to encounter when values change, you lot can examine the execution path of your code, et al. If this is the get-go time that you've tried to debug code, you may want to read Debugging for accented beginners before going through this topic.
The features described here are applicable to C#, C++, Visual Bones, JavaScript, and other languages supported by Visual Studio (except where noted).
Prepare a breakpoint and start the debugger
Breakpoints are a useful characteristic when yous know the line of code or the section of code that you desire to examine in detail at runtime. For more information on the unlike types of breakpoints, such as provisional breakpoints and function breakpoints, run across Using breakpoints.
To debug, you lot demand to start your app with the debugger fastened to the app procedure. F5 (Debug > First Debugging) is the most common way to do that. Even so, correct at present y'all may non take set any breakpoints to examine your app code, so we will practice that starting time and so start debugging. Breakpoints are the most bones and essential feature of reliable debugging. A breakpoint indicates where Visual Studio should append your running code and then you can take a look at the values of variables, or the beliefs of memory, or whether or not a branch of code is getting run.
If yous take a file open up in the code editor, you tin set up a breakpoint past clicking in the margin to the left of a line of code.


Press F5 (Debug > First Debugging) or the Start Debugging push  in the Debug Toolbar, and the debugger runs to the offset breakpoint that it encounters. If the app is not yet running, F5 starts the debugger and stops at the first breakpoint.
Navigate code in the debugger using step commands
We provide the keyboard shortcuts for most commands because they make navigation of your app code quicker. (Equivalent commands such every bit menu commands are shown in parentheses.) For more details on using the step commands, see Navigate code in the debugger.
To kickoff your app with the debugger attached, printing F11 (Debug > Step Into). F11 is the Step Into command and advances the app execution one argument at a fourth dimension. When you start the app with F11, the debugger breaks on the kickoff argument that gets executed.


The yellow arrow represents the statement on which the debugger paused, which likewise suspends app execution at the same indicate (this statement has not however executed).
F11 is a good fashion to examine the execution period in the most detail. (To move faster through code, we show you some other options likewise.) By default, the debugger skips over non-user lawmaking (if yous desire more details, run into Just My Lawmaking).
Note
In managed code, y'all volition see a dialog box asking if you want to be notified when yous automatically step over properties and operators (default beliefs). If you want to change the setting afterward, disable Step over properties and operators setting in the Tools > Options menu under Debugging.
Step over code to skip functions
When you are on a line of code that is a office or method call, yous tin can press F10 (Debug > Pace Over) instead of F11.
F10 advances the debugger without stepping into functions or methods in your app code (the code notwithstanding executes). Past pressing F10, you can skip over lawmaking that you're non interested in. This mode, y'all can quickly become to code that you are more interested in. For more than details on using the step commands, see Navigate lawmaking in the debugger.
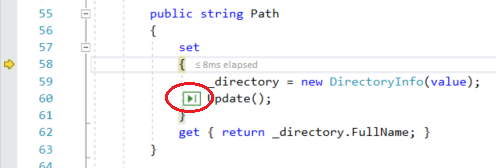
Run to a betoken in your code quickly using the mouse
Using the Run to Click button is like to setting a temporary breakpoint. This command is also handy for getting effectually apace within a visible region of app code. You tin can use Run to Click in any open file. For more than details on this feature and similar navigation features, come across Run to a specific location in your code.
While in the debugger, hover over a line of code until the Run to Click (Run execution to here) push button  appears on the left.

Note
The Run to Click (Run execution to here) button is bachelor starting in Visual Studio 2017.
Click the Run to Click (Run execution to hither) button. The debugger advances to the line of code where you clicked.
Advance the debugger out of the current function
Sometimes, yous might want to continue your debugging session but advance the debugger all the way through the current function.
Press Shift + F11 (or Debug > Pace Out).
This command resumes app execution (and advances the debugger) until the current function returns.
Run to cursor
When you are editing code (rather than paused in the debugger), correct-click a line of code in your app and choose Run to Cursor (or press Ctrl to F10). This control starts debugging and sets a temporary breakpoint on the current line of code. For more details on this feature and similar navigation features, see Run to a specific location in your code.


If you have set up breakpoints, the debugger pauses on the first breakpoint that it hits.
Press F5 until yous reach the line of code where you selected Run to Cursor.
This command is useful when you are editing code and want to rapidly set a temporary breakpoint and kickoff the debugger at the same time.
Note
You lot can utilise Run to Cursor in the Phone call Stack window while y'all are debugging.
Restart your app quickly
Click the Restart  button in the Debug Toolbar (or press Ctrl + Shift + F5).
When you printing Restart, information technology saves time versus stopping the app and restarting the debugger. The debugger pauses at the first breakpoint that is hit by executing code.
If you do want to stop the debugger and get back into the code editor, yous can press the reddish finish  button instead of Restart.
Edit your code and continue debugging (C#, VB, C++, XAML)
In nigh languages supported past Visual Studio, you can edit your lawmaking in the heart of a debugging session and continue debugging. To use this feature, click into your code with your cursor while paused in the debugger, make edits, and press F5, F10, or F11 to continue debugging. For more data on using this feature and on feature limitations, see Edit and Keep.

To modify XAML code during a debugging session, see Write and debug running XAML code with XAML Hot Reload.
Inspect variables with data tips
Now that you know your manner effectually a piffling, you accept a good opportunity to start inspecting your app state (variables) with the debugger. Features that let you to audit variables are some of the about useful features of the debugger, and there are different ways to do it. Oftentimes, when you try to debug an consequence, you lot are attempting to discover out whether variables are storing the values that you wait them to have in a particular app land. For detailed information on using data tips, see View information values in data tips.
While paused in the debugger, hover over an object with the mouse and you encounter its value, or its default property value.


If the variable has properties, you tin can expand the object to see all its properties.
Ofttimes, when debugging, you lot want a quick style to check belongings values on objects, and the information tips are a practiced manner to do it.
Tip
In most supported languages, you can edit lawmaking in the middle of a debugging session. For more info, run across Edit and Continue.
Inspect variables with the Autos and Locals windows
In the Autos window, you lot run into variables forth with their electric current value and their blazon. The Autos window shows all variables used on the current line or the preceding line (In C++, the window shows variables in the preceding three lines of code. Check documentation for language-specific beliefs). For more than information on using these windows, see Audit variables in the Autos and Locals windows.
While debugging, expect at the Autos window at the bottom of the code editor.


Notation
In JavaScript, the Locals window is supported but not the Autos window.
Next, look at the Locals window. The Locals window shows you lot the variables that are currently in telescopic.


In this example, the this object and the object f are in scope. For more than info, see Inspect Variables in the Autos and Locals Windows.
Set a scout
You tin apply a Lookout window to specify a variable (or an expression) that you lot want to proceed an centre on. For detailed data, see Set a Watch using the Watch and QuickWatch Windows.
While debugging, right-click an object and choose Add Watch.


In this case, yous have a watch assail the object, and yous can encounter its value change as you motion through the debugger. Dissimilar the other variable windows, the Watch windows always show the variables that you are watching (they're grayed out when out of scope).
Examine the call stack
The Call Stack window shows the order in which methods and functions are getting called. The top line shows the current function. The second line shows the role or belongings it was chosen from, and so on. The call stack is a good style to examine and understand the execution flow of an app. For detailed information, run into How to: Examine the Call Stack.
Annotation
The Call Stack window is similar to the Debug perspective in some IDEs similar Eclipse.
Click the Call Stack window while you are debugging, which is by default open up in the lower right pane.


You tin double-click a line of lawmaking to go expect at that source code and that as well changes the current scope being inspected past the debugger. This does non advance the debugger.
Yous tin can also use right-click menus from the Phone call Stack window to practice other things. For example, you tin can insert breakpoints into specific functions, restart your app using Run to Cursor, and to become examine source code.
Inspect an exception
When your app throws an exception, the debugger takes you to the line of code that threw the exception. For detailed data, see Inspect an exception using the Exception Helper.

In this example, the Exception Helper shows yous a Organisation.NullReferenceException exception and an error message that says that the object reference is not set to an case of the object. And, information technology tells us that the string value was cypher when yous tried to phone call the Trim method.

In this example, the Exception Helper shows you lot a Arrangement.Argument exception and an error message that says that the path is non a legal grade. Then, nosotros know the error occurred on a method or office argument.
In this example, the DirectoryInfo phone call gave the error on the empty string stored in the value variable.
The Exception Helper is a great feature that can help you debug errors. You can also do things like view error details and add a scout from the Exception Helper. Or, if needed, you can change atmospheric condition for throwing the particular exception. For more than information on how to handle exceptions in your code, come across Debugging techniques and tools.
Expand the Exception Settings node to see more options on how to handle this exception type, merely you don't demand to alter annihilation for this tour!
Configure debugging
You can configure your project to build equally a Debug or Release configuration, configure project backdrop for debugging, or configure general settings for debugging. In addition, you tin configure the debugger to brandish custom information using features such as DebuggerDisplay attribute or, for C/C++, the NatVis framework.
Debugging properties are specific to each project type. For instance, y'all can specify an argument to pass to the application when you commencement it. You tin access the projection-specific properties past right-clicking the project in Solution Explorer and selecting Backdrop. Debugging backdrop typically appear in the Build or Debug tab, depending on the particular project type.
Starting in Visual Studio 2022, the Debug tab for .Internet projects provides a link to the debug launch profiles UI, where you lot can set debug-related properties.


Debug live ASP.NET apps in Azure App Service
the Snapshot Debugger takes a snapshot of your in-production apps when code that you are interested in executes. To instruct the debugger to take a snapshot, y'all set snappoints and logpoints in your code. The debugger lets you see exactly what went wrong, without impacting traffic of your production application. The Snapshot Debugger can help you dramatically reduce the time it takes to resolve issues that occur in production environments.

Snapshot collection is available for ASP.NET applications running in Azure App Service. ASP.Internet applications must be running on .NET Framework iv.six.ane or later, and ASP.NET Cadre applications must be running on .Cyberspace Cadre 2.0 or later on Windows.
For more data, see Debug live ASP.NET apps using the Snapshot Debugger.
View snapshots with IntelliTrace footstep-back (Visual Studio Enterprise)
IntelliTrace step-back automatically takes a snapshot of your application at every breakpoint and debugger step outcome. The recorded snapshots enable you to get back to previous breakpoints or steps and view the country of the application equally it was in the past. IntelliTrace footstep-dorsum can save you time when you desire to see the previous application state but don't desire to restart debugging or recreate the desired app country.
You lot tin can navigate and view snapshots by using the Pace Backward and Step Forrard buttons in the Debug toolbar. These buttons navigate the events that appear in the Events tab in the Diagnostic Tools window.
![]()
For more information, see the Inspect previous app states using IntelliTrace page.
Debug operation issues
If your app runs too slowly or uses too much retentiveness, you may need to test your app with the profiling tools early on. For more information well-nigh profiling tools such as the CPU Usage tool and the Retentiveness Analyzer, see Outset look at the profiling tools.
Side by side steps
In this tutorial, y'all've had a quick look at many debugger features. You may want a more in-depth look at one of these features, such as breakpoints.
Feedback
claycombforienionly.blogspot.com
Source: https://docs.microsoft.com/en-us/visualstudio/debugger/debugger-feature-tour
Post a Comment for "How Can I See My Start Debug Menu Size in Visual Studio"